🧭 Introduction: Why Screenshot Shortcuts Matter in Windows 11
Screenshots have become an essential part of digital life — from capturing error messages for tech support to saving a recipe, tutorial step, or a meme. Whether you’re a content creator, developer, office worker, or student, taking screenshots quickly and efficiently can save you valuable time.
Windows has offered screenshot tools for decades — but Windows 11’s Snipping Tool is the most powerful, streamlined version yet. It combines the classic Snipping Tool and Snip & Sketch apps into one unified interface that’s easy to use, elegant, and packed with hidden features.
Yet, many users still take the long way: searching “Snipping Tool” in the Start menu or fumbling with the Print Screen key. In reality, keyboard shortcuts make the Snipping Tool lightning-fast — letting you capture, annotate, and share screenshots in seconds.
In this comprehensive guide, you’ll learn everything about Snipping Tool shortcuts in Windows 11, from the basics to advanced pro tips. Whether you’re new to Windows or a productivity enthusiast, this post will help you master every snipping workflow.
Also Read: How to Use Disk Cleanup in Windows 11: Free Up Space Easily
🖥️ What Is the Snipping Tool in Windows 11?
The Snipping Tool is Windows 11’s built-in screenshot utility that lets you capture specific parts of your screen, annotate them, and save or share them instantly. It’s the evolution of two earlier tools:
-
Snipping Tool – introduced in Windows Vista, allowing basic area screenshots.
-
Snip & Sketch – added in Windows 10, offering better annotation and sharing features.
Windows 11 merges both into one seamless experience. The new Snipping Tool offers:
-
Four capture modes (rectangular, freeform, window, fullscreen)
-
Annotation tools (pen, highlighter, eraser, ruler)
-
Delay timer options
-
Dark mode compatibility
-
Integration with Clipboard and OneDrive
-
Shortcuts for instant access
To open it manually, you can type “Snipping Tool” in the Start menu or press Windows + Shift + S (the primary shortcut). But that’s only the beginning — there’s a lot more under the hood.
⌨️ The Most Important Snipping Tool Shortcut: Windows + Shift + S
Let’s start with the king of shortcuts:
Windows + Shift + S
Pressing these three keys together instantly activates the snipping overlay on your screen. You’ll see a small toolbar at the top with four capture options:
-
Rectangular Snip – Draw a rectangle to select an exact area.
-
Freeform Snip – Draw any custom shape for irregular selections.
-
Window Snip – Capture a specific window or dialog box.
-
Full-screen Snip – Capture the entire screen at once.
When you take a screenshot, it’s automatically copied to your Clipboard and opens in the Snipping Tool editor (or you can paste it directly into apps like Paint, Word, or email).
💡 Pro Tip:
If you don’t want the Snipping Tool to open after capture, go to Settings → Accessibility → Keyboard → Print Screen Shortcut and toggle clipboard behavior. You can streamline how snips are saved or previewed.
🧩 Understanding the Different Snip Modes
1. Rectangular Snip
This is the default and most commonly used mode. Drag your mouse to capture a clean rectangle area — perfect for partial screenshots of websites or documents.
2. Freeform Snip
Allows you to draw around objects manually. It’s ideal when you need to capture irregular shapes or exclude certain elements from your screenshot.
3. Window Snip
Automatically detects open windows or dialog boxes — you just click the one you want. This is perfect for capturing app interfaces or settings windows without including the taskbar.
4. Full-screen Snip
Takes a full display capture, great for full-page screenshots, games, or presentations.
🖱️ How to Use the Print Screen Key to Launch Snipping Tool
Did you know you can reassign your Print Screen (PrtScn) key to open the Snipping Tool directly?
Here’s how:
-
Go to Settings → Accessibility → Keyboard.
-
Scroll to “Print Screen shortcut.”
-
Toggle Use the Print Screen button to open Snipping Tool ON.
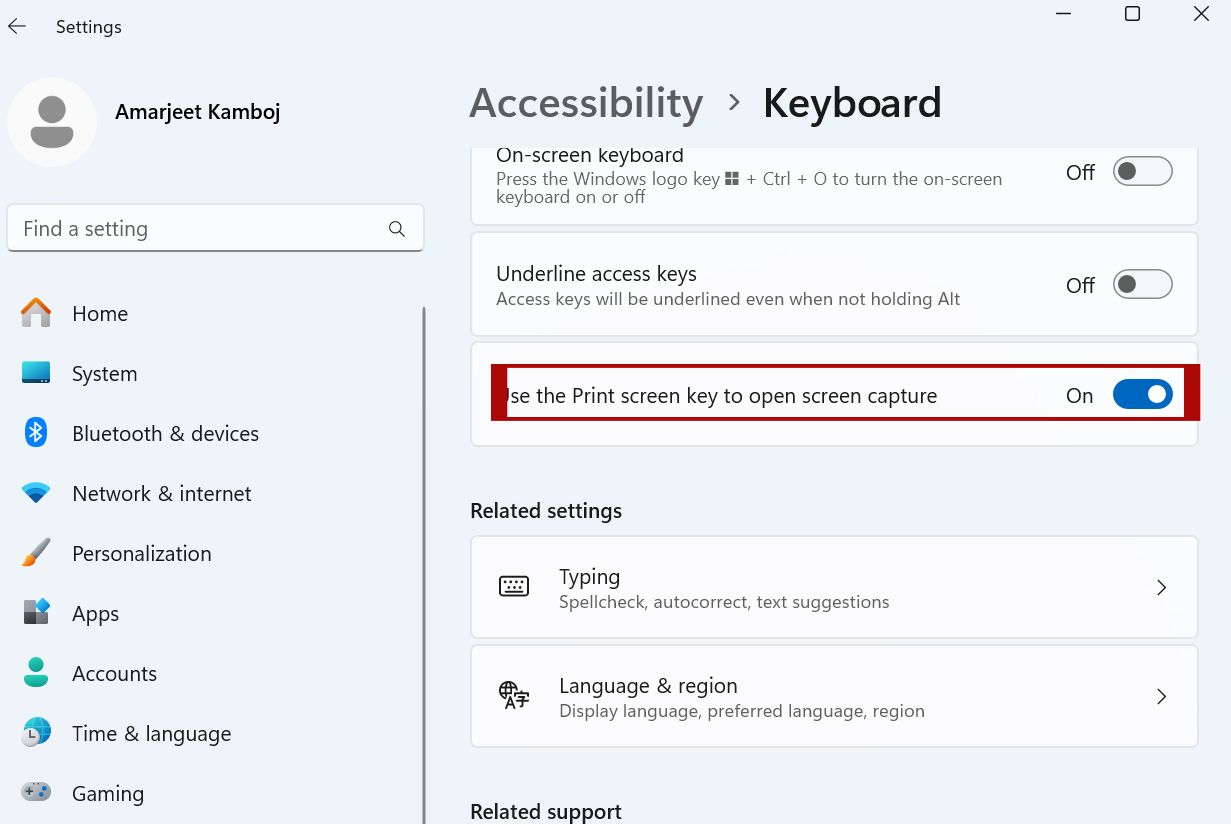
Now, every time you press PrtScn, the Snipping Tool overlay appears — no more juggling multiple keys.
✅ Why This Helps
-
Perfect for laptop users who lack function keys.
-
More consistent across workflows.
-
Reduces accidental full-screen captures.
If it doesn’t work, try restarting Windows Explorer or checking for pending Windows updates — shortcut behavior can break after system updates.
⚙️ Advanced Snipping Tool Features in Windows 11
The Snipping Tool is more than just a capture utility. It includes productivity tools for editing, annotation, and sharing.
✏️ Annotating Screenshots
After taking a snip, the image opens in the editor window. You’ll find:
-
Pen Tool: Draw directly on the image (customize color & thickness).
-
Highlighter: Emphasize important text.
-
Eraser: Remove markup easily.
-
Ruler/Protractor: Straighten your annotations perfectly.
-
Touch Writing: Use a stylus or finger on touch-enabled devices.
🕒 Delay Timer Options
Need to capture a context menu or hover tooltip? Use Delay Snip.
-
Open Snipping Tool → Click the down arrow beside New.
-
Choose a delay time: 3 seconds, 5 seconds, or 10 seconds.
-
Perform your action → Snipping Tool will capture after the timer.
☁️ Auto-Save and OneDrive Sync
By default, screenshots are saved to your Clipboard. But you can configure automatic saving via OneDrive → Settings → Backup → Screenshots.
When enabled, every snip you take is saved under:
OneDrive → Pictures → Screenshots
That means your screenshots are automatically synced and available on all your devices.
🧠 Hidden Productivity Shortcuts You Should Know
1. Paste Screenshots Instantly
After pressing Windows + Shift + S, you can immediately paste (Ctrl + V) into:
-
Word documents
-
Outlook or Teams messages
-
WhatsApp Desktop
-
Photoshop, Paint, or any image editor
2. Use Clipboard History (Windows + V)
You can access previously taken screenshots from your clipboard history.
To enable it:
-
Press Windows + V.
-
Click Turn on if disabled.
-
You’ll now see a list of recent copies and snips.
This is a game-changer when working with multiple screenshots.
3. Launch Snipping Tool via Command Line
You can also launch the Snipping Tool with commands — useful for scripts or automation.
Run this in Command Prompt or Run (Windows + R):
For advanced users, you can create a desktop shortcut or PowerShell script that executes custom snip commands for fast access.
4. Editing Screenshots in Paint or Photos App
Right-click any snip in File Explorer → Open with → Paint (or Photos).
You can then crop, add shapes, or blur content for a professional presentation.
🧰 Troubleshooting Common Snipping Tool Problems
Even though the Snipping Tool is reliable, it can occasionally misbehave. Here are common issues and fixes.
❌ Shortcut Not Working
-
Ensure the Snipping Tool is not disabled in Startup Apps.
-
Check Windows + Shift + S in Settings → Keyboard → Shortcuts.
-
Restart Windows Explorer via Task Manager.
-
Update Windows — Microsoft regularly fixes Snipping Tool bugs.
❌ Snipping Tool Not Opening
If the app won’t launch:
-
Open Settings → Apps → Installed Apps.
-
Search “Snipping Tool.”
-
Click Advanced Options → Reset.
-
Restart your PC.
❌ Clipboard Not Saving Screenshots
If screenshots aren’t appearing in your clipboard:
-
Go to System → Clipboard and ensure “Clipboard history” is ON.
-
Check if a third-party clipboard manager is interfering.
🔄 Reinstall Snipping Tool
If all else fails, reinstall via Microsoft Store:
-
Open Microsoft Store → Library.
-
Search for Snipping Tool.
-
Click Get or Install.
💼 How the Snipping Tool Improves Productivity
Here’s how mastering these shortcuts can transform your workflow:
| Task | Shortcut | Benefit |
|---|---|---|
| Open Snipping Tool | Windows + Shift + S |
Capture instantly |
| Launch via Print Screen | PrtScn (after setting) |
One-tap snipping |
| Copy Screenshot | Ctrl + C |
Quick sharing |
| Paste Screenshot | Ctrl + V |
Fast integration |
| Access Clipboard History | Windows + V |
Retrieve older snips |
| Save Snip | Ctrl + S |
Store for later |
| Open Snipping Tool Settings | Alt + F → S |
Custom setup |
For professionals, these shortcuts can save several minutes daily — adding up to hours of saved time per month.
🔒 Security and Privacy Tips
Screenshots can contain sensitive data — passwords, private messages, or financial details. Always review before sharing.
-
Use the Crop tool to hide unnecessary data.
-
Avoid uploading screenshots to public folders.
-
Clear the Clipboard regularly if working with confidential material.
Windows 11 also integrates with Windows Security, so your screenshots remain in your user account context, not exposed to system-wide access.
🪄 Advanced Integration: Snipping Tool + OneNote + Teams
If you’re part of Microsoft’s productivity ecosystem, Snipping Tool works hand-in-hand with:
-
OneNote: Paste or insert snips directly into your notebooks.
-
Teams: Share annotated screenshots during meetings.
-
Outlook: Paste screenshots into emails instantly — no need to attach image files.
This integration makes the Snipping Tool a silent hero in Microsoft 365 environments.
📱 Using Snipping Tool on Touchscreen and Tablets
For touch devices like the Surface Pro, Snipping Tool supports:
-
Stylus Snipping: Press the top pen button to trigger
Windows + Shift + S. -
Touch Input: Use your finger to select snip areas or annotate.
-
Palm Rejection: Automatically disables accidental touch input when using a pen.
Go to Settings → Bluetooth & devices → Pen & Windows Ink to configure pen shortcuts for snipping.
🧮 Performance and File Formats
Snipping Tool supports several image formats:
-
PNG (default, lossless quality)
-
JPEG (smaller size)
-
GIF (basic compatibility)
-
HTML (when shared via email)
For web content creators, saving as PNG ensures clarity, while JPEG is better for smaller blog uploads.
When saving, use clear filenames like:
“Windows11-snipping-tool-shortcuts.png”
This not only keeps your files organized but also improves SEO when uploading images to your website.
📈 SEO Tip for Bloggers Using Snipping Tool Screenshots
If you’re writing tech tutorials, screenshots are gold for SEO. When uploading Snipping Tool images:
-
Compress them with tools like TinyPNG.
-
Add descriptive filenames.
-
Include alt text (e.g., “Windows 11 Snipping Tool shortcut overlay”).
-
Use images at 1200px width for optimal Bing and Google display.
This ensures your blog loads fast, improves visual ranking, and keeps AdSense CTR healthy.
🔧 Power User Tips and Hidden Settings
-
Change Snip Outline:
-
Open Snipping Tool → Settings → Toggle “Snip outline.”
-
Customize color and thickness to highlight captures.
-
-
Enable Sound Notification:
-
In Settings, toggle “Play sound when snip is captured.”
-
-
Auto-copy to Clipboard:
-
Ensure “Automatically copy changes” is ON for seamless pasting.
-
-
Dark Mode Interface:
-
Matches your Windows theme for comfort during long sessions.
-
📚 Frequently Asked Questions (FAQ)
🖱️ 1. What is the shortcut key for the Snipping Tool in Windows 11?
The primary shortcut to open the Snipping Tool in Windows 11 is Windows + Shift + S. Pressing these keys together activates the snipping toolbar, allowing you to choose between rectangular, freeform, window, or full-screen snips. It’s the fastest way to take screenshots without manually opening the app.
⌨️ 2. How do I use the Print Screen key with the Snipping Tool?
You can set your Print Screen (PrtScn) key to open the Snipping Tool:
-
Go to Settings → Accessibility → Keyboard.
-
Toggle Use the Print Screen button to open Snipping Tool.
Once enabled, pressing PrtScn will launch the snipping overlay immediately.
🪄 3. What are the four snip modes in Windows 11?
The Snipping Tool offers four capture modes:
-
Rectangular Snip – Capture a rectangular area.
-
Freeform Snip – Draw any custom shape.
-
Window Snip – Capture a specific window or app.
-
Full-screen Snip – Capture the entire screen.
These modes cover nearly every screenshot need.
🕒 4. How do I take a delayed screenshot in Windows 11?
To take a delayed snip:
-
Open Snipping Tool.
-
Click the down arrow beside New.
-
Select a delay time (3, 5, or 10 seconds).
-
Perform the action you want to capture — the tool will automatically take the screenshot after the delay.
💾 5. Where are Snipping Tool screenshots saved by default?
By default, Snipping Tool images are copied to your clipboard.
If you enable OneDrive’s screenshot backup, they’re automatically saved to:OneDrive → Pictures → Screenshots.
You can also use Ctrl + S after capturing to save manually in any folder.
🖋️ 6. Can I edit screenshots in the Snipping Tool?
Yes. Once you capture a screenshot, it opens in the built-in Snipping Tool editor.
You can use:
-
Pen or highlighter tools
-
Eraser for markup removal
-
Ruler or protractor for precision lines
-
Crop and rotate tools
You can even switch between light and dark mode for easier editing.